Bird photography transforms dramatically when we master the art of capturing side profiles. These lateral perspectives reveal intricate details that frontal shots often miss – from the graceful curve of a wing to the delicate patterns adorning feather edges. We’ve discovered that side view compositions create more ever-changing storytelling opportunities while showcasing the bird’s natural proportions and behaviors.
Professional wildlife photographers consistently rely on side angles to highlight exact characteristics. The profile position allows us to capture the full wingspan spread the distinctive head crest or the unique bill shape that defines each species. These shots also provide better depth perception making our subjects appear more three-dimensional against their backgrounds.
Whether you’re photographing backyard songbirds or exotic species side view techniques unlock creative potential that elevates ordinary bird photos into compelling visual narratives. We’ll explore proven methods to position ourselves for these striking lateral captures while respecting wildlife boundaries and maximizing our photographic impact.
Understanding Bird Side View Anatomy and Structure
Building on our exploration of side profile photography techniques, we’ll examine the anatomical features that make these perspectives so valuable for bird identification and documentation.
Key Body Parts Visible in Profile
Head structure reveals the most distinctive identification markers when captured from the side. We can observe eye placement, bill shape, and crest variations that remain hidden in frontal views. The supercilium, or eyebrow stripe, becomes clearly defined in profile shots.
Body proportions emerge with remarkable clarity from lateral angles. Breast depth, back curvature, and belly shape create the characteristic silhouette that separates species families. Songbirds display compact bodies, while waders show elongated profiles.
Leg positioning demonstrates natural posture and movement patterns. We notice how perching birds grip branches, while ground foragers reveal their stance preferences. Waterfowl showcase their paddle placement during swimming motions.
Neck length varies dramatically between species and becomes most apparent in side views. Herons extend their necks during hunting, while ducks retract theirs for streamlined swimming. These variations help us identify behavioral adaptations.
Wing Position and Shape Characteristics
Folded wing positioning creates distinct triangular patterns along the bird’s flanks. Primary feathers stack in precise layers, while secondaries form smooth curves against the body. Each species maintains unique folding patterns that aid identification.
Wing length ratios become measurable against body size from profile angles. Long-distance migrants show extended wings that reach beyond tail tips, while resident species display shorter proportions. These measurements help determine flight capabilities.
Covert arrangement forms visible stripes and patches across folded wings. Greater coverts create bold wing bars, while lesser coverts add subtle texture patterns. We use these markings as primary identification features.
Scapular positioning affects overall wing appearance when birds rest. These shoulder feathers create smooth transitions between wings and back, forming species-exact patterns. Raptors show prominent scapular patches that distinguish genera.
Tail Configuration and Length Variations
Tail shape categories include square, rounded, forked, and pointed configurations visible from side angles. Swallows display deeply forked tails for aerial maneuverability, while thrushes show square endings for precise perching control.
Length proportions relative to body size indicate ecological adaptations. Woodpeckers possess short, stiff tails for trunk support, while flycatchers use long tails for catching insects mid-flight. We measure these ratios for accurate species identification.
Graduated feather patterns create layered effects when viewed laterally. Outer tail feathers may extend beyond inner ones, forming pointed silhouettes. Jays and magpies showcase dramatic graduation that aids in flight control.
Undertail covert visibility provides additional identification markers often overlooked in other angles. These fluffy feathers beneath the tail create distinct color patches and patterns. Warblers frequently display contrasting undertail markings that separate similar species.
Identifying Common Backyard Birds From Their Side Profile

Recognizing familiar backyard species becomes significantly easier when we understand their distinctive side view characteristics. Each bird’s lateral profile reveals unique features that help us distinguish one species from another at a peek.
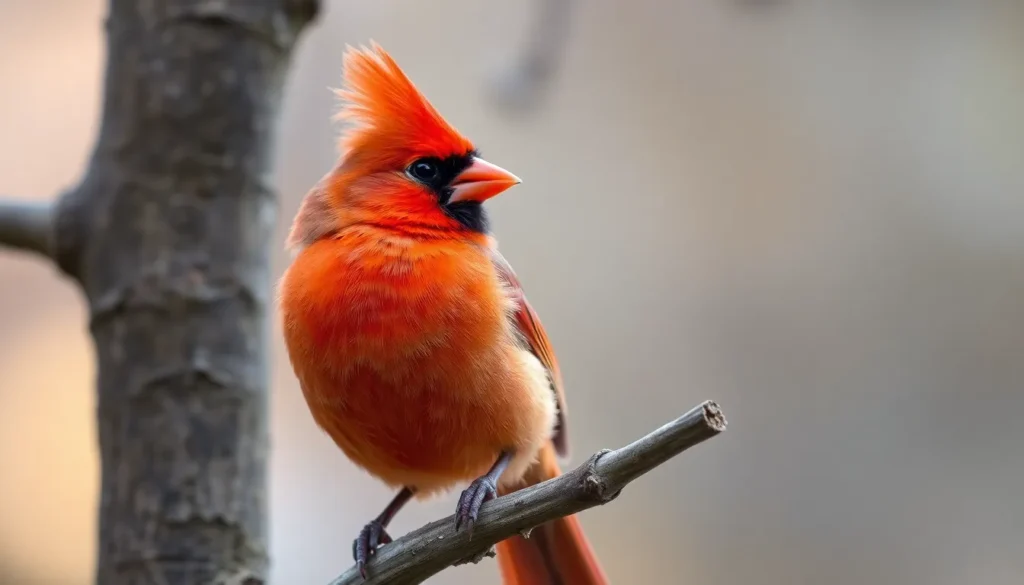
Cardinal Side View Features
Cardinals display one of the most recognizable side profiles in backyard bird identification. We can immediately spot their prominent red crest that sweeps back from their rounded head, creating a distinctive triangular silhouette against their bright scarlet plumage.
Their thick, cone shaped bill appears perfectly designed for cracking seeds and stands out prominently in profile shots. Cardinals maintain a compact, robust body shape that measures approximately 8.5 to 9 inches from beak to tail tip.
The black mask surrounding their eyes and extending to their throat creates a striking contrast that’s easily visible from the side. Female cardinals share the same body proportions but display warm brown coloring with subtle red highlights on their wings, tail, and crest.
Robin Profile Characteristics
Robins present a classic thrush profile that’s instantly recognizable in most North American backyards. We notice their upright posture immediately, with their orange red breast creating a bold color block that extends from throat to belly.
Their medium length legs appear sturdy and well proportioned for ground foraging, while their dark gray to black head contrasts sharply with their lighter colored back. Robins measure roughly 10 inches in length with a relatively straight, yellow tipped bill that’s perfectly adapted for catching worms and insects.
The tail appears moderately long and slightly notched, while their wings fold neatly against their brownish gray back. During breeding season, males display deeper, more vibrant orange coloring that becomes particularly striking in side view photography.
Blue Jay Distinctive Side Markings
Blue jays showcase one of the most complex and beautiful side profiles among backyard birds. We can identify their brilliant blue upperparts immediately, which contrast dramatically with their white underparts and create a stunning two toned appearance.
Their prominent black necklace extends from the back of their head around to their throat, forming a distinctive collar that’s clearly visible in profile. Blue jays measure approximately 11 to 12 inches long and display a sturdy, confident posture with their pointed crest often raised in alertness.
The wings reveal intricate black barring and white patches that create unique patterns visible only from certain angles. Their strong, pointed bill appears well suited for their omnivorous diet, while their relatively long tail helps with their agile flight patterns through dense vegetation.
Black markings around their eyes and face create additional identifying features that distinguish them from other blue colored birds in our region.
Capturing the Perfect Bird Side View Photograph

Getting that perfect side profile shot requires mastering the technical and practical aspects of bird photography. We’ll explore the essential camera settings, lighting conditions, and positioning strategies that elevate your bird side view photographs from amateur snapshots to professional-quality images.
Camera Settings for Sharp Bird Profiles
Aperture priority mode (f/5.6 to f/8) delivers the sharpest results while maintaining adequate depth of field for clear subject definition. We recommend using these mid-range aperture settings because they provide optimal lens performance and ensure the entire bird profile remains in focus.
Shutter speeds of 1/1000s or faster freeze motion effectively, preventing blur from sudden movements like head turns or wing adjustments. Birds can move unexpectedly, so we always set our cameras to at least 1/500s for stationary subjects and 1/2000s for active birds.
ISO settings between 400-1600 maintain image quality while allowing flexibility in varying light conditions. Modern cameras handle these ISO ranges exceptionally well, producing minimal noise in your bird side view photographs.
Continuous autofocus (AI Servo/AF-C) tracks moving subjects seamlessly, ensuring sharp focus even when birds shift positions slightly. We pair this with back-button focus to maintain precise control over focus points during the shooting process.
Single-point autofocus mode concentrates on exact areas like the bird’s eye or head profile, giving you exact control over the sharpest part of your image.
Ideal Lighting Conditions for Side Shots
Golden hour lighting (first and last hour of sunlight) creates warm, soft illumination that enhances feather textures and reduces harsh shadows on bird profiles. We find this timing produces the most flattering light for showcasing intricate plumage details.
Overcast conditions provide even, diffused lighting that eliminates strong shadows and bright highlights, making it easier to capture balanced exposures across the entire bird profile. Cloud cover acts as a natural softbox, creating ideal conditions for detailed side view photography.
Side lighting from a 45-degree angle reveals dimensional depth in bird profiles, highlighting the contours of head shapes, bill structures, and body proportions. We position ourselves so the light source illuminates the side of the bird facing our camera.
Avoid harsh midday sun that creates unflattering shadows under the bird’s body and bill, which can obscure important identification features. Direct overhead lighting flattens the bird’s profile and reduces the three-dimensional quality we want to capture.
Reflected light from water or light-colored surfaces can provide gentle fill lighting for birds photographed near lakes, ponds, or sandy areas, helping to illuminate shadowed areas naturally.
Positioning Techniques for Clear Side Views
Approach birds at ground level or slightly below to capture their natural proportions and avoid the compressed look that comes from shooting down at subjects. We often use low angles to showcase the bird’s true profile against clean backgrounds.
Maintain distances of 15-30 feet depending on the bird species and their comfort levels, allowing you to fill the frame while respecting wildlife boundaries. Smaller songbirds typically require closer positioning than larger raptors or waterbirds.
Position yourself perpendicular to the bird’s body for the clearest side profile view, ensuring you capture the full length from bill tip to tail end. We watch bird behavior patterns to predict when they’ll turn sideways to our camera position.
Use natural barriers like bushes or trees as blinds to conceal your presence while maintaining clear sight lines to your subject. Birds often ignore photographers who remain still behind partial cover.
Wait for birds to settle into natural poses rather than rushing shots of active or alert subjects, as relaxed birds display their true body proportions and characteristic postures. We’ve found that patient photographers capture more authentic side view portraits.
Choose backgrounds that contrast with the bird’s coloring to make the profile stand out clearly, avoiding busy or similarly colored backgrounds that cause the subject to blend in.
Drawing and Sketching Birds in Side View

Translating our photographic knowledge into artistic expression opens new creative possibilities. Drawing birds from side profiles helps us understand their anatomy while developing essential artistic skills.
Basic Proportions and Guidelines
Establishing the head to body ratio serves as our foundation for accurate bird sketches. We typically use a 1:3 proportion where the head measures one unit and the body spans three units in length. This ratio works effectively for most songbirds including robins, cardinals, and sparrows.
Creating geometric shapes simplifies the initial sketching process and ensures proper proportions. We start with an oval for the head, connecting it to a larger elongated oval for the body. The body oval should tilt slightly downward from front to back, mimicking the natural posture we observe in photographs.
Positioning the eye correctly determines the overall accuracy of our bird portrait. We place the eye approximately one third back from the beak tip and slightly above the head’s centerline. This placement captures the alert expression that makes side view drawings compelling.
Drawing guidelines for leg placement helps maintain proper balance in our sketches. We position the legs directly beneath the bird’s center of gravity, typically falling at the midpoint of the body oval. Most perching birds show their legs emerging from the lower third of the body when viewed from the side.
Establishing wing proportions requires understanding how folded wings relate to body size. We sketch the wing outline extending from just behind the head to roughly three quarters of the body length. Primary flight feathers should reach or slightly exceed the tail tip in most species.
Adding Details and Texture
Developing feather patterns transforms basic shapes into realistic bird representations. We begin with large feather groups rather than individual feathers, sketching the wing coverts, flight feathers, and body contours as distinct sections. Each section follows the bird’s natural curvature and creates depth through overlapping layers.
Creating texture through line variation brings life to our bird drawings. We use short, curved strokes to indicate fluffy breast feathers and longer, more defined lines for wing and tail feathers. Varying our line weight from thin to thick adds dimension and suggests the different feather types we observe in nature.
Adding characteristic markings helps identify exact species in our artwork. We include distinctive features like the cardinal’s black face mask, the robin’s white eye ring, or the blue jay’s barred wing pattern. These details should be added after establishing the basic form and proportions.
Suggesting depth through shading creates three dimensional form in our flat drawings. We identify our light source and add shadows beneath the bird, under the wing, and along the body’s underside. Gradual shading transitions look more natural than harsh lines between light and dark areas.
Refining bill and eye details completes our bird portrait with precision. We shape the bill according to the species’ feeding habits, making it thick and conical for seed eaters or thin and pointed for insect hunters. The eye should appear bright and alert with a small highlight that suggests life and awareness.
Common Mistakes to Avoid
Oversizing the head creates cartoon like proportions that lack realism. We maintain the 1:3 head to body ratio consistently across different bird species, adjusting only for naturally large headed birds like owls or woodpeckers. When in doubt, we make the head slightly smaller rather than larger.
Misplacing the legs destroys the bird’s natural balance and posture. We avoid positioning legs too far forward or backward by remembering that perching birds grip with their feet directly below their center of mass. Ground feeding birds may show a more forward leg position but still maintain overall balance.
Drawing flat, lifeless wings results from treating wings as simple geometric shapes. We remember that folded wings have depth and create subtle curves along the bird’s side. Wing tips should follow the body’s contour rather than appearing as flat additions to the basic form.
Adding too much detail too quickly overwhelms our drawings and obscures the overall form. We establish solid proportions and basic shapes before adding individual feathers or intricate markings. Each detail should enhance rather than compete with the bird’s essential character.
Ignoring light direction creates confusing shadows and unrealistic form. We choose one consistent light source and apply shading accordingly throughout our drawing. Mixed lighting destroys the three dimensional illusion we work to create through careful observation and technique.
Best Birds for Side View Observation and Study

We’ve identified exact bird groups that offer exceptional opportunities for side profile observation and study. These species provide distinctive lateral characteristics that make them ideal subjects for both photography and field identification.
Raptors and Their Distinctive Profiles
Hawks showcase powerful builds with broad shoulders and thick necks that create unmistakable silhouettes when viewed from the side. Red-tailed hawks display prominent breast muscles and compact body proportions that distinguish them from other raptors. Their head-to-body ratio remains consistent at approximately 1:4, making field identification more reliable.
Eagles present massive profiles with distinctive head shapes and robust chest development visible in lateral views. Bald eagles exhibit white head feathers contrasting sharply against dark body plumage, while golden eagles show uniform coloration with slightly smaller head proportions.
Falcons demonstrate streamlined builds optimized for high-speed flight, with pointed wings that extend beyond their tail tips when folded. Peregrine falcons reveal distinctive facial patterns and compact bodies measuring roughly 15-20 inches in length.
Owls offer unique nighttime observation opportunities with their upright posture and rounded facial discs creating circular profiles. Great horned owls display prominent ear tufts and stocky builds that measure 18-25 inches tall.
Songbird Silhouettes and Shapes
Finches provide excellent beginner subjects with their compact, rounded bodies and distinctive bill shapes visible in profile. House finches show slightly curved bills adapted for seed consumption, while goldfinches display more pointed beaks and measure 4.3-5.1 inches in length.
Thrushes offer classic songbird proportions with balanced head-to-body ratios and upright postures that create ideal study subjects. American robins maintain consistent 8-11 inch body lengths and display distinctive orange breast coloration in lateral views.
Warblers present challenging identification opportunities due to their small size and quick movements, but their side profiles reveal important field marks. Yellow warblers show compact builds measuring 4.7-5.1 inches, while their pointed bills indicate insect-eating adaptations.
Woodpeckers display specialized anatomical features including strong necks and rigid tail feathers that support their vertical feeding positions. Downy woodpeckers measure 5.5-6.7 inches and show distinctive black-and-white patterns in profile.
Waterfowl Side View Characteristics
Ducks exhibit diverse body shapes that reflect their exact ecological adaptations and feeding behaviors. Mallards display classic duck proportions with streamlined bodies measuring 19.7-25.6 inches and distinctive curved necks.
Geese present large, substantial profiles with long necks and robust builds designed for terrestrial grazing and aquatic navigation. Canada geese show consistent proportions across their 30-43 inch body length and maintain distinctive black head patterns.
Swans offer majestic observation subjects with elegant neck curves and pristine white plumage that creates stunning lateral compositions. Mute swans measure 56-62 inches and display graceful S-shaped neck positions in profile.
Herons provide unique wading bird characteristics with elongated necks and legs that create distinctive angular profiles. Great blue herons stand 38-54 inches tall and demonstrate patient hunting postures that offer extended observation opportunities.
Using Field Guides for Bird Side View Identification

Field guides become invaluable resources when we master the art of interpreting bird side profiles. We can dramatically improve our identification accuracy by learning to decode the exact lateral characteristics that distinguish one species from another.
Key Features to Look for in Profile
Bill shape and size serve as our primary identification markers when examining birds from the side. We notice how seed-eating birds like cardinals display thick, conical bills, while insect-eaters such as warblers show thin, pointed beaks. Nectar-feeding hummingbirds present extremely long, needle-like bills that extend well beyond their head length.
Eye placement and head structure provide critical identification clues in lateral views. We observe that predatory birds position their eyes forward-facing, while prey species like doves show eyes placed on the sides of their heads. Woodpeckers display distinctively angular head shapes with reinforced skulls, creating sharp geometric profiles.
Leg length and positioning help us categorize bird families instantly from side angles. We recognize that wading birds like herons exhibit exceptionally long legs that extend far below their body, while perching songbirds show shorter, proportionate legs. Ground-dwelling species such as quail demonstrate sturdy, medium-length legs positioned centrally under their compact bodies.
Tail proportions and shape offer decisive identification features in profile photography and field observation. We distinguish between the deeply forked tails of swallows, the square-cut tails of flycatchers, and the rounded tails of thrushes. Woodpeckers show rigid, pointed tail feathers that function as braces during vertical climbing.
Comparing Similar Species Side by Side
Hawk identification becomes manageable when we examine side profiles of similar raptors together. We differentiate Cooper’s hawks from sharp-shinned hawks by noting the Cooper’s larger head projection beyond the wing leading edge and its more rounded tail tip. Red-tailed hawks display broader wings and bulkier chest profiles compared to the sleeker red-shouldered hawks.
Flycatcher distinctions emerge clearly through side view comparisons of these notoriously difficult species. We identify eastern phoebes by their slightly larger heads and more upright posture compared to least flycatchers. Great crested flycatchers show significantly longer tails and more pronounced crests when viewed laterally against smaller Empidonax species.
Warbler separations become achievable through careful profile analysis of similar yellow birds. We distinguish American goldfinches from yellow warblers by noting the goldfinch’s shorter tail and more compact body structure. Palm warblers display longer tails with constant tail-pumping behavior, contrasting with the stable posture of yellow-rumped warblers.
Seasonal Plumage Changes in Side View
Breeding season transformations create dramatic alterations in bird side profiles throughout spring and summer months. We observe how male red-winged blackbirds develop brilliant red shoulder patches that become prominently visible in lateral views. Scarlet tanagers transition from olive-green winter plumage to striking red bodies with black wings, completely changing their profile appearance.
Molting patterns affect side view identification during late summer and early fall periods. We notice how American goldfinches gradually lose their bright yellow breeding plumage, appearing patchy and mottled in side profile photos. Cedar waxwings may show missing tail feathers during molt, creating temporarily altered silhouettes.
Winter plumage adaptations modify familiar bird profiles as cold weather approaches our observation areas. We recognize how white-throated sparrows develop more pronounced white throat patches that become highly visible in side views. Northern cardinals maintain their distinctive profiles year-round, though females may appear slightly duller during winter months while retaining their characteristic crest and bill shape.
Bird Side View Photography Equipment and Tips

Having the right equipment can make the difference between capturing a mediocre bird side view and creating a stunning wildlife portrait that showcases every feather detail.
Essential Camera Gear for Bird Photography
DSLR or mirrorless cameras provide the foundation for professional bird side view photography. We recommend full frame sensors for their superior low light performance and crop sensor bodies for their natural telephoto advantage that brings distant birds closer.
Battery grips extend shooting time during long birding sessions while improving camera balance with heavy telephoto lenses. Most wildlife photographers carry at least three fully charged batteries since cold weather and continuous autofocus drain power quickly.
Memory cards with fast write speeds prevent buffer overflow when shooting rapid burst sequences. We use cards rated at 95MB/s or faster to capture multiple side profile shots as birds move through different poses.
Weather protection keeps equipment functional in challenging outdoor conditions. Rain covers, lens hoods, and camera armor protect against moisture, dust, and impact damage during extended field sessions.
Lens Selection for Optimal Side Shots
Telephoto lenses between 300mm and 600mm deliver the reach needed for bird side view photography without disturbing subjects. Prime lenses offer superior sharpness and wider apertures, while zoom lenses provide compositional flexibility for varying distances.
Focal length considerations depend on your target species and shooting environment. Backyard birds work well with 200-400mm lenses, while distant raptors and waterfowl require 500-800mm focal lengths for frame filling compositions.
Aperture performance affects both depth of field and shutter speed capabilities. Lenses with f/4 or f/5.6 maximum apertures provide excellent sharpness for side profiles while maintaining reasonable weight and cost compared to f/2.8 alternatives.
Image stabilization becomes crucial at longer focal lengths where camera shake degrades image quality. Modern lens stabilization systems compensate for 3-5 stops of movement, enabling handheld shooting at slower shutter speeds.
Stabilization Techniques for Sharp Images
Tripods provide rock solid support for heavy telephoto lenses during static bird photography sessions. Carbon fiber models offer excellent stability while reducing weight during long hikes to prime birding locations.
Monopods balance mobility with stability for active bird tracking situations. We prefer adjustable height monopods with tilting heads that allow quick positioning adjustments as birds move between perches.
Proper shooting stance improves handheld stability when tripods aren’t practical. Tuck your elbows against your body, breathe steadily, and squeeze the shutter gently to minimize camera movement during exposure.
Burst mode techniques increase your chances of capturing tack sharp side profiles. Shoot 3-5 frame sequences to account for minor focus variations and select the sharpest image during post processing review.
Electronic stabilization in modern cameras works alongside lens stabilization for maximum shake reduction. Enable both systems when shooting handheld, but disable in-body stabilization when using sturdy tripod support to prevent interference.
Educational Benefits of Studying Bird Side Views

Bird side views serve as powerful educational tools that transform how we understand avian biology and behavior. These lateral perspectives offer unique learning opportunities across multiple educational contexts.
Teaching Bird Anatomy to Children
Visual learning becomes remarkably effective when we use bird side profiles to introduce young minds to anatomical structures. Children can easily identify and remember body parts like the head, neck, wings, and tail when these features are clearly displayed in profile view.
Interactive lessons flourish as students trace the outline of a bird’s silhouette, connecting each anatomical feature to its exact function. We’ve found that children retain information better when they can point to the curved beak of a hawk or the long legs of a heron in side view photographs.
Comparative anatomy lessons become captivating when we place side profile images of different species side by side. Students can observe how a woodpecker’s straight, chisel-like bill differs from a hummingbird’s needle-thin beak, making abstract concepts tangible and memorable.
Hands-on activities such as creating bird profile puzzles or matching games help reinforce anatomical knowledge. These activities encourage children to actively participate in their learning while developing fine motor skills and visual recognition abilities.
Scientific Research Applications
Morphometric studies rely heavily on standardized side view measurements to document species variations and evolutionary adaptations. Researchers use these profiles to calculate precise ratios between wing length, bill size, and body proportions across different populations.
Behavioral research benefits from side view documentation as scientists can accurately record feeding postures, territorial displays, and mating behaviors. These lateral perspectives capture subtle movements and positions that might be missed from other angles.
Species identification databases incorporate thousands of side profile images to help researchers distinguish between closely related species. Museums and research institutions maintain extensive collections of these standardized views for taxonomic studies and field guide development.
Conservation monitoring programs use side view photography to track population changes and document physical adaptations to environmental pressures. This consistent documentation method allows researchers to compare data across decades of study.
Building Observation Skills
Attention to detail improves dramatically when we focus on bird side profiles during field observations. Students learn to notice subtle differences in posture, feather patterns, and proportions that distinguish one species from another.
Pattern recognition develops as observers practice identifying birds from their lateral silhouettes alone. This skill proves invaluable when birds are backlit or partially obscured by vegetation during field studies.
Scientific sketching abilities advance through regular practice of drawing bird profiles, as students learn to accurately represent proportions and anatomical details. These drawing exercises enhance both artistic skills and scientific observation techniques.
Critical thinking skills strengthen when students analyze why certain anatomical features appear prominent in side view while others remain hidden. This analysis helps them understand the relationship between form and function in avian anatomy.
Memory retention increases significantly when students regularly study and identify birds from their side profiles, creating lasting mental images that serve them throughout their birding careers.
Digital Resources for Bird Side View References

Digital platforms now offer comprehensive collections of bird side view images and identification tools. We’ve compiled the most valuable online resources to enhance your bird profiling studies.
Online Bird Identification Databases
eBird serves as the industry’s largest biodiversity-related citizen science project, featuring over 1 billion bird observations with extensive side profile photographs. We find their species maps particularly useful since they show seasonal distributions alongside high-quality lateral view images from photographers worldwide.
Birds of the Industry provides scientifically accurate illustrations and photographs for over 10,000 bird species, including detailed side profile views. Their range maps integrate seamlessly with identification photos, making species comparison straightforward for birders studying profile characteristics.
All About Birds from Cornell Lab maintains an extensive database with multiple side view angles for each species. We appreciate their inclusion of juvenile and adult variations in profile shots, plus their integration of vocalizations that help confirm identifications made from visual side profiles.
iNaturalist connects observers globally through crowd-sourced bird identification, featuring millions of side profile submissions. Their AI-powered species suggestions improve accuracy when uploading your own side view photographs for community verification.
Mobile Apps with Side View Features
Merlin Bird ID offers instant photo identification using Cornell’s vast database of side profile images. We recommend this app because it works offline and provides location-based species lists that narrow down potential matches from your side view observations.
eBird Mobile syncs seamlessly with the desktop platform while offering field-friendly checklists and photo uploads. Their recent observations feature shows nearby bird activity, helping you anticipate which species you might encounter for side profile photography.
Seek by iNaturalist uses real-time camera identification to instantly recognize birds from side views. We’ve found their species achievement system particularly captivating for building side profile identification skills through gamification.
BirdNET specializes in sound identification but includes visual confirmation through side profile galleries. Their species confidence ratings help validate identifications when combining audio and visual side profile observations.
Virtual Bird Watching Platforms
Cornell FeederWatch live cameras provide 24/7 access to bird feeders across North America, offering consistent side profile viewing opportunities. We monitor their multiple camera angles to study feeding behaviors and side profile characteristics throughout different seasons.
Audubon Bird Cams feature high-definition streaming from nests, feeders, and migration sites worldwide. Their archived footage allows us to study side profiles during various behaviors like nesting, feeding, and territorial displays.
Bird Academy online courses combine live streaming with educational content focused on identification techniques. We value their structured approach to teaching side profile recognition through interactive modules and expert-led virtual field trips.
Zoom birding tours connect participants with professional guides who highlight side profile identification features during live virtual sessions. These platforms offer real-time learning opportunities with experts who can point out subtle profile characteristics we might miss during independent observation.
Conclusion
Mastering bird side view photography and observation opens up a industry of possibilities for both photographers and nature enthusiasts. We’ve explored how these lateral perspectives serve as powerful tools for species identification while offering exceptional artistic and educational opportunities.
Whether we’re capturing the perfect shot with our telephoto lens or sketching detailed anatomical features in our field notebook these side profiles provide invaluable insights into avian behavior and biology. The combination of proper technique equipment knowledge and patience creates a foundation for meaningful wildlife documentation.
We encourage you to apply these strategies during your next birding adventure. Start with common backyard species and gradually expand your skills to include more challenging subjects. Remember that every side profile we capture or sketch contributes to our deeper understanding of these remarkable creatures and helps preserve their stories for future generations.
Frequently Asked Questions
What makes side profile photography so important for bird identification?
Side profile photography reveals crucial anatomical features that aid in species identification, including head structure, bill shape, body proportions, wing patterns, and tail configuration. These lateral perspectives showcase distinctive characteristics like wingspan, leg positioning, and neck length that are often obscured in frontal shots, making them invaluable for both amateur birders and professional researchers studying bird morphology and behavior.
What camera settings work best for capturing sharp bird side profiles?
Use aperture priority mode with f/5.6 to f/8 for optimal sharpness, shutter speeds of 1/1000s or faster to freeze motion, and ISO settings between 400-1600 for best image quality. These settings ensure crisp details while maintaining proper exposure. Consider using continuous autofocus mode and burst shooting to capture multiple frames as birds move into perfect profile positions.
Which birds are easiest to identify from their side profiles?
Cardinals stand out with their prominent red crest and thick cone-shaped bill, while robins are recognizable by their upright posture and orange-red breast. Blue jays display brilliant blue upperparts with a distinctive black necklace. These common backyard birds have distinctive silhouettes and coloring patterns that make side profile identification straightforward for beginners.
What lighting conditions produce the best bird side profile photographs?
Golden hour lighting (early morning or late afternoon) provides warm, soft illumination that enhances feather textures and creates appealing backgrounds. Overcast skies offer even, diffused lighting that reduces harsh shadows and brings out subtle feather details. Avoid midday harsh sunlight, which can create unflattering shadows and wash out important identifying features in your bird photographs.
How close should I get to birds for side profile photography?
Maintain a respectful distance of at least 15-20 feet for most songbirds, using telephoto lenses between 300mm and 600mm to fill the frame without causing stress. Observe bird behavior for signs of disturbance like alert postures or vocalizations. Use natural barriers like trees or blinds for concealment, and approach slowly at ground level to avoid appearing threatening to the birds.
What equipment is essential for bird side profile photography?
A DSLR or mirrorless camera with telephoto lens (300-600mm) is crucial for maintaining safe distances while capturing detailed shots. Tripods or monopods provide stability for sharp images, especially in low light. Fast memory cards, extra batteries, and weather protection ensure your equipment performs reliably during extended outdoor photography sessions in various conditions.
How do I draw accurate bird side profiles from observation?
Start with basic geometric shapes using a 1:3 head-to-body ratio as your foundation. Focus on key proportional relationships like wing length to body size and leg placement. Add feather texture gradually through careful shading and pattern work. Avoid common mistakes like oversizing the head or misplacing leg positions, which can make your bird sketches appear unrealistic.
What digital resources help with bird side profile identification?
eBird, All About Birds, and Birds of the World offer extensive databases of side profile images with identification tools. Mobile apps like Merlin Bird ID and Seek by iNaturalist provide instant identification assistance using photo recognition technology. Virtual platforms like Cornell FeederWatch and Audubon Bird Cams offer real-time observation opportunities for studying bird behaviors and profiles.
How do side profiles benefit bird education and research?
Side profiles effectively teach bird anatomy through visual learning, making complex biological concepts accessible to students of all ages. In research, they enable precise morphometric measurements, behavioral documentation, and conservation monitoring. These standardized views allow scientists to compare species characteristics, track population changes, and study evolutionary adaptations across different bird groups.
Which bird groups offer the best side profile study opportunities?
Raptors like hawks and eagles provide distinctive silhouettes with prominent features, while songbirds such as finches and thrushes offer balanced proportions ideal for study. Waterfowl including ducks, geese, and swans display unique lateral characteristics with varied bill shapes and body structures. Each group presents different learning opportunities for understanding avian diversity and adaptation.